Sunday, November 29, 2015

Zippers and Drawstrings


I pulled some cotton pieces from my box of scraps and 
used them to make a few
zippered pouches and drawstring bags


Happy Sewing Everyone!

Thursday, November 12, 2015

Mailbox v. Vandals


When we moved here in 1979, we took a look at the dented, lopsided, spray painted, uprooted mailboxes of our neighbors and decided to get a post office box in town instead of having a mailbox at the top of the driveway. This worked fine until the past couple of years when the MVA began addressing mail to our house instead of to our post office box. Because we didn’t have mail delivered at the house, the post office simply returned our mail to the MVA. Driver’s license renewals? Returned to the MVA. Registration renewals? Returned to the MVA. Ack! So, after 36 years, we bought a mailbox, painted our house number on it, set a post in the ground, mounted the box on an arm on the post and waited for the MVA to send us something.

The mailbox was up for not quite two months before the local vandals discovered it. Two weekends out of the last three, our mailbox was pulverized. The first time, it was dented and the little red flag was ripped off. We took the box down, pounded out the dents, riveted the flag back onto the box, and re-mounted it on the post. The second time, the little turds beat the living daylights out of it. In addition to being dented, the bottom of the box was torn from the top, the door wouldn’t close, the arm on the post was twisted and the post was leaning to one side. The photo above shows the mailbox after the second round of repairs. Believe me, it looked a heck of a lot worse before we worked on it.

We hated to remount the box, only to have it vandalized again. Internet research revealed all kinds of interesting ways to defeat mailbox vandals. Unfortunately, some of the ideas were super expensive. Others were a heck of a lot of work. Still others seemed likely to injure either the vandals or to pose a hazard if a motorist ran into the post. We eventually found one idea, though, which made a lot of sense and after the second time we beat our mailbox back into something resembling a mailbox, we put the idea into practice.

The underside of our box has two brackets on it. When we put the brackets back on the box after repairing it the second time, we added two long nails which poke down through the brackets. The distance between the nails is the same as two pre-drilled holes on the arm of the post.


We drilled two holes in a piece of wood and mounted it to the arm of the post so the holes line up with the two pre-drilled holes on the arm. We also mounted our newspaper box to this with cable ties.  


Then, we put a handle on top of the mail box. Now all we have to do is slip the two nails into the holes each morning to mount the box. Then each evening, we grab the box by the handle, pick it up, and bring it (and the mail) back to the house.


This is a tiny bit of extra work for us, but it’s no big deal. With any luck, the vandals will leave the post and the newspaper box alone. Fingers crossed.  

Monday, November 2, 2015

Singer 2404 reverse repair


Several years ago, I saw this machine listed for sale on eBay. When I asked the seller about packing it for shipment, she said all the right things, so I placed my bid. Unfortunately, my bid was the high bid. 

When the machine arrived, it was in a cardboard box without any packing material at all. None. Zero. Zip. Nada. Not a wadded up newspaper. Not a single packing peanut. Nothing. The machine was in its original case (which was one of the reasons I wanted it), but the box was too small for the case, and during shipment the handle on top of the case was crunched down into the top of the case, which broke the handle and cracked the top of the case. Because there was no packing material whatsoever, the bottom of the case had broken into a dozen pieces. The foot controller had rattled around, broken into several chunks, and spewed graphite disks everywhere. The top of the machine (the part with the spool holder on it) was cracked and bent. Considering the complete lack of packing material, I was surprised the machine wasn't in worse shape. 

When I contacted the seller, she seemed genuinely surprised when I told her about the machine's condition. After we talked about it, we agreed I would keep the damaged machine and she would refund my shipping costs plus half of my purchase price. I hadn't paid much for the machine, so this was a fair deal for both of us, I think. 

I junked the many, many pieces of plastic and found replacements for the top of the machine and the foot controller. I've never found another original case (still hoping, though!), but I did find a new case which fits the machine the same way the old one did. I also picked up a Singer 1862 at a rummage sale because it came with a box of cams which will fit this machine. 

In the photo above, you can see a big pink button on the right front side of the machine. When you push it in and hold it in, the machine is supposed to reverse. The machine ran like a champ -- going forward and in reverse -- until recently when it decided it didn't want to stitch in reverse. E took a look at it today and the solution wasn't obvious, but it was simple. 

The arrows in the next photo point to two set screws on the bottom of the machine.


The one on the top was super loose. The one on the bottom was a little bit loose. These set screws hold the bearings for the rods which control the feed dogs and because the rods were loose, the feed dogs weren't willing to reverse. Once E pushed the bearings over to the left to take the play out of the rods and tightened the two screws, the problem was solved. Now the 2404 sews a nice stitch going forward and in reverse. Yay! 

Thursday, October 29, 2015

Singer 15-91


Well, folks, another one followed us home. In early June, we met a fellow who inherited a Singer 15-91 (this one was made in 1950) and wanted to get rid of it. The good news: The machine wasn't missing any parts and came with a box of accessories, the foot controller, the power cord, and the little green instruction booklet. The perhaps not so good news: For some reason, all the electrical wiring had been disconnected. Because there's always room for one more sewing machine, we loaded it in the back of the Spark and brought it home.

We had a lot of things going on this summer and didn't have a chance to take a good look at the machine right away. When we did, we found it was a tad dirty, which was no surprise. Take a good look at the feed dogs. Not the worst we've seen, but still pretty icky.


We cleaned the machine, oiled and greased it, polished the chrome parts, and replaced the light bulb with a cooler, brighter LED bulb. E used gold acrylic paint on the stitch length regulator so we can see the numbers. (See how to do this at http://vssmb.blogspot.com/2011/07/how-to-restore-your-stitch-length.html). Before he did this, the numbers weren't visible at all.


He took off the motor, inspected it thoroughly, cleaned a few things, and replaced the wicks. We started thinking about the reasons someone would disconnect all of the wiring from a machine and decided the number one reason would be to keep the house from burning down, so we replaced the power and pedal cords. As we worked on the machine, we ran it through its paces using the hand wheel (no power) many, many times. When we finally plugged it in and gave a cautious, light press on the foot controller, the machine didn’t smoke or burst into flames. In fact, it ran steadily and smoothly. Yay!

I had to read the instruction manual to figure out how to thread it on top – In my defense, it’s a bit odd. Then, I sent a bunch of scraps through and it made a nice, even stitch. Its new home is a cabinet (with a knee controller) we found at a thrift shop and refinished a while ago. Now all I have to do is decide what to sew for its first project as a new-to-me machine. Happy Sewing Everyone!

Saturday, October 24, 2015

Kenmore 1040


Yesterday, I went to a church rummage sale and found a plastic, rose-covered carrying case with a $10 price tag hanging from it. When I picked it up, I knew something was in there and when I looked underneath, I could see it was a Kenmore 158.1040. I headed for the check out line.


When I got home and opened the case, the 3/4 size Kenmore was nestled inside. It's 12.75 inches long, 5 inches wide, and 10 inches tall. The throat is almost 7 inches at its widest point. I haven't stepped on the scale with it, but I'm guessing it weighs a little more than 15 pounds. 


If you're wondering where the thread spool pin is, it's down inside the machine. You pull it up when you want to sew and push it down before you put the machine back in the case. The little flip-out accessory box was there and inside were three presser feet (a fourth foot was on the machine), a blind stitch guide, four buttonhole guide feet, one extra bobbin, a needle, a needle plate for zigzag stitching, and a couple of screw drivers. 


To create extra bed space, the accessory box rotates forward and the hinged extension on the end flips up.


The accessory box comes out and behind it is where you find your bobbin and the lever to lower the feed dogs.


E and I cleaned it and oiled it. To do this, we opened the cover plate on the end with the light bulb and then popped off the cover plate on the top of the machine. On the end with the hand wheel, the cover plate is held in place by a screw at the bottom and by a pin at the top. The pin is held in place by a screw (see next photo) which we had to loosen before we could remove the side cover plate. The bottom of the machine is held in place with a few screws, too. We downloaded a free manual from the Sears parts website and it shows where the oiling points are.


After we had everything cleaned and oiled, one problem became apparent right away: The clutch on the hand wheel wouldn't release. We Kroiled the living daylights out of it and left it overnight.  Here's where we put the Kroil:


This morning, I tried releasing the clutch and was surprised when it broke free very easily. The only other problem we found is the feed dogs don't drop. We're hoping the Kroil will work its magic on them. If not, it's no big deal. 

[Update: Eureka! Two days after I posted this, we got the feed dogs to drop. On the underside of the machine, there’s a rod with a pointed tip which passes through a cylinder and pokes out through a ring. (If you have your machine on its back with the bobbin case facing up, the rod/cylinder/ring are to the right of the bobbin case.) When you turn down the lever to drop the feed dogs, the rod ought to pull back from the ring and go into the cylinder. Our rod wasn’t moving, so we Kroiled and heated it until it finally moved freely back and forth in the cylinder. Alas, the feed dogs still wouldn’t drop because even though the rod was pulled back into the cylinder, the ring continued to move up and down when the cylinder moved up and down. There are a couple of joints between the ring and the feed dogs and after we Kroiled and heated those, we finally got the action we wanted.]

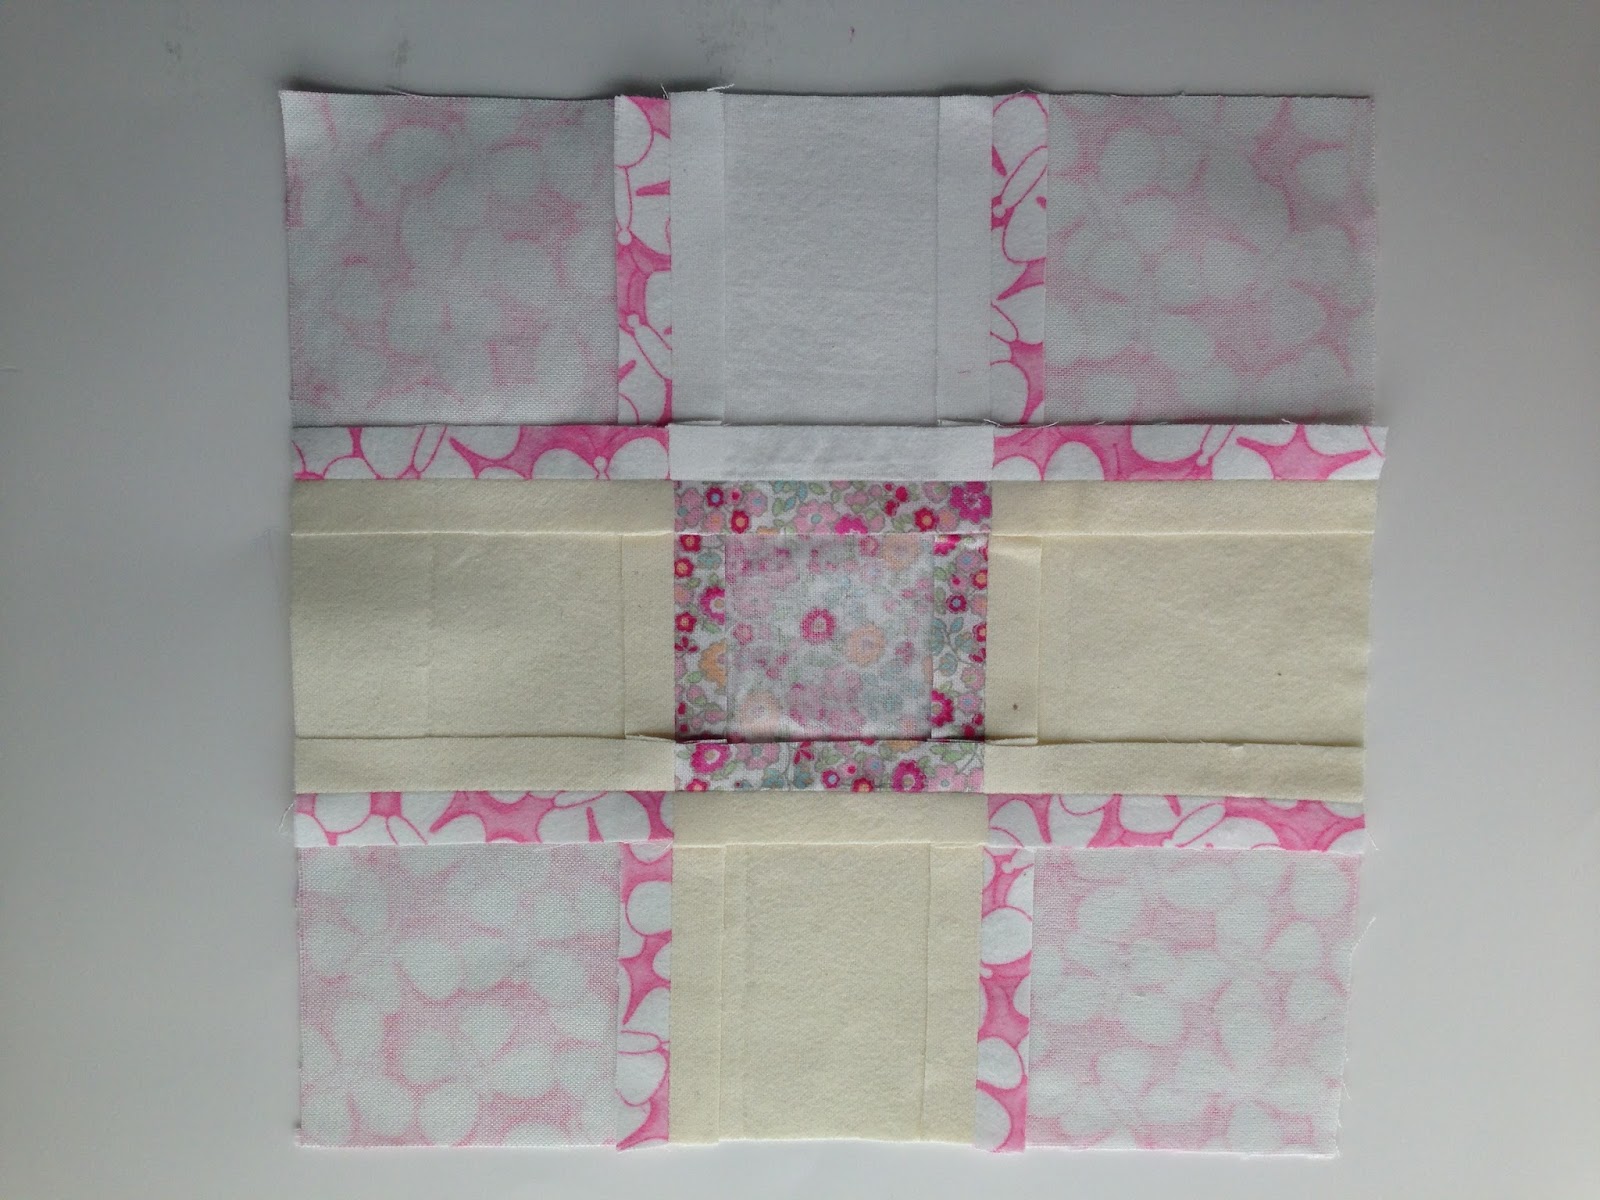
The moment of truth finally arrived when we plugged in the machine and started sewing. It made a straight stitch very easily and after it had warmed up a little bit, it began to zigzag and do all of the other built-in stitches. It does a special mending stitch, a blind stitch, and a stretch stitch. There are three other settings on the special stitch dial which you use to make buttonholes. 

I didn't exactly need another sewing machine, but I couldn't resist this little guy. Happy sewing everyone! 


Thursday, October 22, 2015

Quilted Wall Hangings


My sister's birthday is today so I dug into my box of flannel scraps and made two wall hangings for her.


They're both 18 x 18 inches and they have the same backing:


My sister sews, too, but these are most likely things she wouldn't make for herself and I think she will like them. A lot of her sewing is for dogs -- Check her out on Facebook where she's known as K9Tailor. Happy birthday, B!!  

Sunday, October 11, 2015

New Light Fixture


Several months ago, we started looking for a new light fixture for our front porch. We wanted to have a fixture on only one side of the front door, and we couldn't find anything which would look good as a single fixture. After doing a bit of searching on the internet we found Turtle On A Rock Studio, which is the home of Laura Armstrong, a terrific metal artist located in Texas. Laura worked with us to get exactly what we wanted. 


The fixture is 27 inches high, 7 inches wide, and 4 inches deep. It's made of steel and has our house number on it. Laura included all the wiring needed to install it, along with a set of clear installation instructions. There's a fitted cap on top and a bug screen on the bottom. She gave us the option of using whatever kind of glass we wanted and we chose to use stained glass. The glass is mostly shades of green with some purple swirls which don't show in the pictures you see here. Even though I can't manage to get a decent photo of it, you get the idea, right? Honest to goodness it looks great. At night, when the lights are shining through the stained glass, it's beautiful. 

Even if you aren't in the market for a light fixture, you might want to take a look at Laura's website which shows you more of her work. (No disclaimer needed. The only interest we have in Turtle On A Rock Studio is our interest in promoting art!)


Saturday, October 10, 2015

Kenmore 1336


In the late 1970s (I think it was 1976, but I'm not 100% sure), I bought this machine brand new from Sears. For years, the 158.1336 was my only machine and it has always done everything I've asked.  


As you can see, it's a free arm machine and the little tab over on the right lowers the feed dogs. It's a low shank machine and it uses class 15 bobbins. One feature I like a lot is the way the presser foot lever works. You can use it to raise the presser foot what I'll call a "normal" amount and you can keep pushing the lever up to raise the presser foot higher if you're sewing something thick. A lot of machines can do this, but not all of them can. 


You turn the dial on the top to select the stitch you want to sew. This machine can sew straight, zig zag, blind, straight stretch, rick-rack stretch, and overcast stretch stitches. It does not use cams, so it doesn't do any fancy stitches. The pressure regulator (in the upper left corner on the machine in the photo above) on this machine adjusts more precisely than any of the regulators on my other machines. 


There's not much to see on the back side, except the label saying the machine head came with a 25 year warranty. Fortunately, I never needed to use the warranty. A bit of oil and a good cleaning now and then has kept the 1336 perfectly happy. The machine fits inside a plastic case which doesn't have room for much of anything except the machine and the foot controller and cord. 

When I said this machine has always done everything I've asked, I wasn't kidding. I've used it to sew everything from a silk jacquard dress with double-layered silk organza sleeves . . . 


. . . to the seat and side panel upholstery for a 1991 Geo Metro convertible.


I can't imagine I paid very much for this machine, because I didn't have much to spend. Whatever I paid was well worth it, though. Happy sewing everyone! 

Monday, September 28, 2015

Hot Pepper Relish


Recently, we picked 20 pounds of peppers from our garden. We didn't want to freeze them because we've been freezing peppers all summer and we have enough frozen to last through the winter. We didn't want to use them fresh because we have plenty of fresh peppers left in the garden and because even though we love peppers, it would take us quite a while to eat 20 pounds of them. So, we decided to make pepper relish. 

Half the peppers we used were mild -- orange, red, and green bell plus some red banana peppers. 


The other half were chilies, jalapeños, and some little red fireballs which are a lot hotter than either the chilies or the jalapeños. They taste like I imagine molten lava would taste. One of my aunts gave us the seeds for these years ago and we've grown them (and saved the seeds) ever since. 


We seeded the mild peppers and the jalapeños, chopped up all of the peppers and some onion, added sugar, salt, cider vinegar, and mustard seed, and set things on the stove to boil.


Then, we filled pint jars and processed them in a hot water bath.  


We thought this batch would be warm, not hot, because only half of the peppers were hot. Instead, we ended up with 15 pints of the hottest relish we've ever made. We plan to add a little bit to anything that needs some zip. A very little bit! 

Friday, August 21, 2015

Flannel Animal Quilt


You're probably wondering whether the box of flannel scraps is ever going to be empty. Well, I'm wondering the same thing. The more scraps I use, the more scraps seem to be in the box. This small (38 x 38 inches) quilt has lions and tigers and bears. (Oh my.) It also has sheep, chicks, frogs, giraffes, elephants, monkeys, sea creatures, bunnies, owls, an alligator, and a hippopotamus. The animals joined forces to create alternating light and dark diagonal stripes. The backing is a blue blender flannel which I rolled forward to create the binding. Happy sewing, everyone! 

Saturday, July 4, 2015

A Flannel Quilt for July 4


This is the second small flannel quilt I've made from scraps someone gave me. For this one, I chose airplanes, trains, trucks, hot rods, boats, scooters, some solid pieces, a few pieces with a sports theme (the orange ones), and some with small flat-head screws on them (the red ones). I used a zig zag stitch, my Singer 401, and a walking foot, the same as I did with the quilt I told you about on June 9. To make the binding, I brought the backing fabric toward the front of the quilt, turned the raw edge under, and machine stitched it in place.


I have a lot of scraps left and a few ideas for what I want to do with them, so expect more posts like this one -- eventually! 


Tuesday, June 9, 2015

Flannel Quilt


Two months ago, someone gave me a box filled with flannel scraps. There were lots of long, skinny strips and hundreds of irregularly shaped small pieces. The two largest pieces in the box were 9 inches square. The smart thing to do would have been to shove the box into a dark corner of my sewing room and forget about it. Instead, I made this 38 x 38-inch flannel quilt.

Working with stretchy flannel was challenging for me. After I cut my pieces, I sprayed them with Magic Sizing and ironed them flat before I sewed them. The directions on the sizing spray can said to use a lower heat setting than the one appropriate for the fabric, but this didn't work for me. I set my iron on cotton and left it there. After I sewed my seams, I sprayed them with sizing and ironed them open instead of pressing them to one side because I thought the seams would have been too thick otherwise.


I started quilting using a straight stitch in the ditch. But, when I was about half way finished I decided I didn't like the way it looked so I picked out everything and quilted using a zig zag stitch which I liked a lot better. I used my Singer 401 with a walking foot for the whole project, including the zig zag stitches. You can see the zig zag stitching in this photo of one of my favorite squares – The one and only piece of sock monkey fabric in the entire box.


The binding is made from scraps, too. I made it 2.5 inches wide, but would make it 3 inches if I had it to do over again. I machine stitched the binding to the top side and hand stitched it to the back. The back, shown below, is a piece of flannel from my stash.


There are a ton of scraps left in the box and I have a couple of ideas for what I might like to do with them, so stay tuned. Happy sewing, everyone!


Thursday, April 30, 2015

New Pilot Makes His First Pilots 'n Paws Flight

Chances Angel Rescue and Education rescued Marvin and Baxter and found foster homes to care for them until they were ready to take their next step toward permanent homes. Yesterday, Chances Angel volunteers brought the two pups to the airport in Roxboro, North Carolina, and helped load them into E's Cherokee. 


Two hours later, E landed in Frederick, Maryland where he met Chris who got his private pilot's license less than a week ago and immediately signed up to fly for Pilots 'n Paws. 


Chris flew Marvin and Baxter to Wings Field near Philadelphia, where he was met by Almost Home Dog Rescue, which will find permanent homes for these two little guys. If you look closely at the left edge of the photo, you can see Marvin peeking out from the rear window.


Welcome to Pilots 'n Paws, Chris!