Thursday, January 15, 2015

Christmas in January


Nearly two years ago, we planted 2,100 tiny trees which are protected by plastic tree shelters held in place with wooden stakes. Even though some of the trees are now more than six feet tall, we need to keep the shelters in place until they're quite a bit bigger. Unfortunately, the deer and damp weather combine forces to make sure the shelters fall over regularly, which means we have to reinstall them. We've been doing this on foot while carrying all of the equipment we need to get the job done. Juggling the shelters and the stakes while carrying a shovel and a small sledge hammer wasn't a lot of fun. Neither was walking back and forth to the barn when we discovered we needed a cable tie and walking back and forth again when we discovered we needed a length of twine and walking back and forth again . . . . . You get the idea. This is what they looked like in April 2013:


We started looking for a reasonably priced John Deere Gator (or something similar) to carry our “stuff” and to spare us the endless walks to and from the barn, when we found this little guy on craigslist.


The engine, drive train, wheels, and body belonged to a 4x4 John Deer Gator, and the clever guy who sold it to us turned it into what you see in the photos. It runs like a champ. It has headlights and a blindingly bright spot light. There's a windshield wiper and a fan. The prior owner did some nice wood work under the removable dump bed. 


The snow plow is stainless steel. 


The wooden cabin comes off with a few screws. 


It cost less than 20% of what we would have paid for a Gator without a cabin or a snow plow and we are 100% happy.  

Monday, December 29, 2014

Lucky Dog

On December 20, E made a Pilots 'n Paws flight for nine rescued dogs who began the day in North Carolina and ended up with rescue organizations in New Jersey and New York. Let's take a look at the passengers.

This mom and her four puppies were rescued by Pam. One of Pam's co-workers told her a family was planning to take these dogs to the local high-kill shelter the next day, so Pam picked them up and took them home with her and found a rescue group in New Jersey to take them.


These three siblings were rescued by a family who found them dumped in the middle of a road near their farm. The family kept them safe until Pam found a rescue group in New York to take them.


Lucky and his mom were living at an abandoned farm. Mike noticed the dogs and began stopping every day to feed them. As you can see, Lucky had a serious injury to his back. He also had a rip in his tongue. Mike got in touch with Pam, and Pam took Lucky home with her. The same New Jersey rescue group which agreed to take the mom and her puppies also agreed to take Lucky. Mike made arrangements to keep mom safe until she can make it to her rescue group in Connecticut.


Early in the morning on December 20, Pam loaded all nine dogs into her Jeep and headed for the airport in Roanoke Rapids, North Carolina, while Michele and her co-pilot Dennis flew to Roanoke Rapids from their home base in Maryland. All nine dogs boarded Michele's Cessna 172, and Michele and Dennis flew home where E met them. The dogs boarded E's Piper Cherokee and he flew them to New Jersey. The mom and her puppies and Lucky stayed in New Jersey with their rescue group, while the three siblings boarded Charlie's Piper Archer so he could fly them from New Jersey to their rescue group in New York.

In his first few days in New Jersey, Lucky had surgery to repair the rip in his tongue and to graft skin onto the wound on his back which the vet says was caused by a large bird. He is now in a good home where he will stay until his health issues are resolved and he's ready to be adopted. Here's how Lucky spent Christmas Day. A few days earlier, he wasn't able to lie on his back.


If you'd like to get the warm fuzzy reward which comes from helping an animal in need, take a look at the Pilots 'n Paws website.  

Friday, December 26, 2014

Button Foot Controller Repair


My Singer 401 has a button foot controller which I use by way of a knee bar. Until recently, the 401 had one speed – 100 m.p.h. It was polite enough to wait until I pressed on the knee bar before it started sewing. But, once it started, it went flat out all the time. E took it apart and fixed the problem and I thought I'd share how he did it.

You'll want to take a look at what Sid had to say about button foot controllers in his February 22, 2012 post at http://oldsingersewingmachineblog.com. Sid explains how the controller works and he has some great photos of the inside of the controller which will be helpful to you as you keep reading this post. (Thanks, Sid!)

E unscrewed the little feet on the bottom of the controller and took the top off the base. Someone had already removed the capacitor from between the two terminals, so it wasn't causing a problem. As you can see from Sid's photos, there's a screw which runs all the way through the white porcelain case which contains the variable resistance. The tip of the screw pokes up toward two little rectangular copper contacts and has a little plate attached to it. The little plate that's attached to the tip of the screw ought to touch the copper contacts when you have the button on the foot controller pressed all the way down. This gives you a resistance-free path from one terminal to the other and this is what gives you full speed.

When E looked inside my controller, he saw that when he pushed down on the t-shaped lever the button sits on, the little plate was touching the copper contacts well before the t-shaped lever was pushed all the way down. This explained the 100 m.p.h. speed.

To fix the problem, E slightly turned the screw clockwise which moved the little plate lower on the screw. He kept turning the screw until the little plate was barely touching the copper contacts when the t-shaped lever was pressed all the way down.


The button controller is back in the 401's cabinet and it works great. If you're having a similar problem, you might want to grab a screwdriver and give this a try. Happy Sewing!   

Tuesday, December 23, 2014

Singer 201


I'd been looking for a Singer 201 for a while and found one on craigslist which was advertised as not working. The seller was asking a fair price for a sewing machine which wouldn't sew, and E and I decided to buy it and see if we could revive it.

The machine came in a cabinet which held the original attachments and the manual.


We were planning to junk the cabinet, but decided to keep it because it's less than 30 inches long (with both leaves folded up) and we knew we could find room for it somewhere in the house. As you can see, E did a beautiful job of refinishing it.

Here's what it looked like when we brought it home. Lots of nicks, scratches, and dings.


And here's what it looks like now, after E refinished it.  Beautiful, eh?


Before we took the machine out of its cabinet, we did some preliminary diagnostic work. We plugged it in and flipped its little white toggle switch. The light came on and nothing smelled like it was burning, both of which were encouraging signs. Next, we tried to turn the hand wheel. It wouldn't budge. After ruling out a few other possible causes, we figured there must be a jam under the rotating hook assembly. Sure enough, when we removed the assembly, there was the tangle of doom. After we removed it (we needed tweezers and a flashlight) and put the assembly back together, we were able to spin the hand wheel.

The machine's cabinet had a built-in foot controller which didn't work. However, there was an after-market foot controller installed on the machine and when we very briefly pressed on it, the motor hummed and the needle bar went up and down.

Next, we took the machine out of the cabinet, blew the dusty bits out of its nooks and crannies, and polished all of the shiny parts. It looked good. But would it sew?


After we oiled and lubricated it, we took it for a test drive. There was a problem with the thread tension which ended up being a problem with the bobbin thread tension. After a little bit of adjustment, the thread tensions were balanced and the 201 was ready to sew.

This 201, which was made in 1950, purrs like a kitten and sews a beautiful stitch, plus the cabinet is gorgeous. I'm happy to add it to my herd.


Tuesday, December 9, 2014

Embroidery Machine + Refnished Sewing Machine Cabinet

I got a new toy a few weeks ago. No, it isn't another sewing machine. It's an embroidery machine! Hancock Fabrics had the Brother HE1 on sale and after I watched a HSN youtube video about this model, I decided to get one. It's a pretty basic machine, but the price was great.


The machine was easy to set up. All I had to do was snap the carriage onto the bed, plug in the power cord, and turn it on. It comes with enough gear to let you use it right away. Brother included a spool of bobbin thread plus several bobbins, three spools of upper thread, a 4x4 inch hoop and three sheets of stabilizer. There's also a plastic dust cover and a few miscellaneous bits (seam ripper, stylus, spool caps, etc.). The manual is thorough and easy to understand.

For my first project, I embroidered the name of one of my sister's dogs onto fabric I made into a reversible scarf. The combination of thin fabric and a high stitch count resulted in a lot of puckering.  Still, not too bad for my first try.


I bought 63 spools of thread from an eBay seller who shipped them really fast. The spools in my local fabric stores are $6 each (ouch!) so I was happy to find a good seller online. There are a lot of web vendors who have embroidery designs and alphabets available, and some of the designs are free. I was looking for some interesting, inexpensive alphabets and I found www.8clawsandapaw.com which sells them at reasonable prices.

I downloaded a couple of free designs onto my Mac, put them on a USB stick, blew the dust off an old IBM laptop running Windows XP (the Brother isn't compatible with Macs), and plugged the USB stick into the laptop. Then I connected the laptop to the embroidery machine using the cable which came with the machine, and dragged the designs from the USB stick onto the drive for the embroidery machine. When the designs showed up on the machine's LCD screen, I saved them there. You can only save a few designs to the machine, but you can load as many as you want onto your Windows-based computer and send them directly to the machine whenever you want to use them. The machine has a slot for embroidery cards, too.

I also downloaded an iPad app called StitchBuddyHD, which allows me to combine designs, change colors, re-size designs (within limits), etc. I played around with it quite a bit and I liked it enough get the Mac version of StitchBuddy which allows me to do even more things. (If you have a Mac, StitchBuddy lets you download it and try it for free a few dozen times.) StitchBuddyHD and StitchBuddy for Mac allowed me to change the colors of this plane's paint and eliminate a window. Then I combined the plane design with the numbers and letters built into the machine.


Even though I said I wasn't going to post anything about a refinishing project for a while, here I go again. E spotted a Copenhagen style Singer sewing machine cabinet at the local thrift store for $15. As you can see, it was in sad shape before E sanded it, stained it, and sealed it.


I want to use the cabinet for my embroidery machine, so E took some pegboard and a couple of 1/4 inch dowels cut into 1-3/8 inch pieces and made spool holders for the two top drawers. The bottom drawer holds stabilizer, the manual, and everything else that came with the machine. Yay!


Happy sewing and embroidering everyone.

Friday, November 21, 2014

Refinishing A Dining Room Table

I swear this is going to be the last post (for a while, at least) about refinishing anything. But, this is a little different from the other things I've posted about, which is why I decided to go ahead and share.

Earlier, we told you we moved everything out of the dining room so we could refinish the floor. When then time came to move everything back into the dining room, we took a hard look at the dining room table. The finish had lots of nicks and scratches and worn spots. This wasn't a surprise because we (mostly me) have put this table through a lot in the last 35 years. I've used it as my cutting table for dozens of sewing projects and as my work bench for stripping off old car seat upholstery and then cutting, sewing, and installing the new upholstery. It's where I start my seedling garden plants in the spring. We've used it to inventory boxes of old car parts. It's no wonder the finish on the table looked so bad.


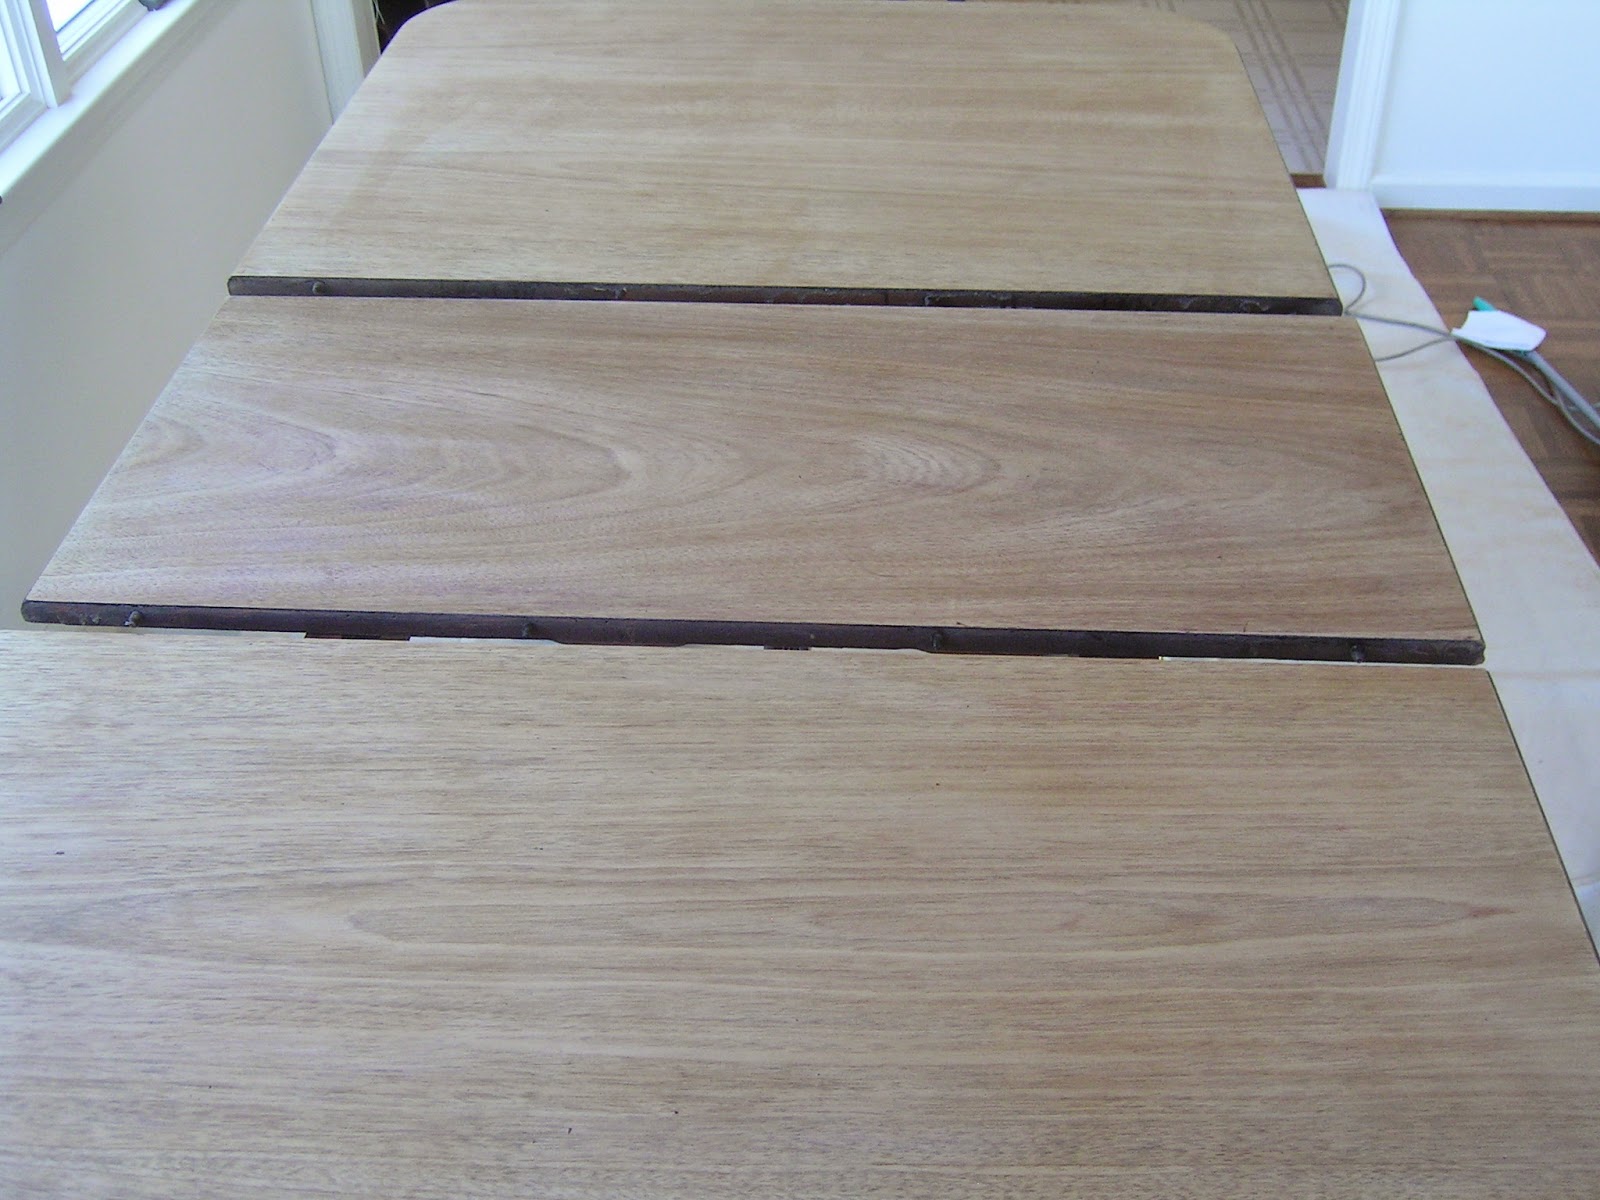
E used his small orbital sander to take off the old finish, starting with the leaf in the middle. If you look closely at the upper edge of the section on the right, you can see how badly the finish was worn in places. Also, when you look at these "before" photos, notice how the finish hides the grain of the wood.


E had the entire table sanded in a couple of hours. It would have gone faster, except we did this inside so he had a bag on the sander to catch the dust and he had to stop sanding and empty the bag every ten minutes. Here's what the entire table top looked like when E finished sanding.


The next step was to stain the table to match the rest of the furniture. Even though we used the lightest mahogany stain we could find, we wiped it off almost as soon as we brushed it on. The directions on the can said to leave it on for five to fifteen minutes before wiping off whatever hadn't soaked into the wood. If we'd done this, the table would have been way too dark.  Here's the table with the stain on it.


Next came six coats of satin finish polyurethane coating.


It hardly looks like the same table, does it? There was a nice wood grain hiding under the old finish and the polyurethane will protect the finish for many years to come.

Wednesday, November 12, 2014

Upper Tension on a Lady Kenmore 89

Yesterday, I used my Lady Kenmore 89 to make a simple scarf.  I nearly drove myself nuts in the process because I couldn't get the upper thread tension adjusted properly.  On all of my other sewing machines, I adjust the upper thread tension by turning the little knob on the tensioner from 1 to 6, for example, until the tension is set properly.  The LK89's upper tensioner is marked 1 through 6, and even though I turned the knob all the way from 1 to 6 yesterday, it didn't make much of a difference in the upper thread tension.

This morning, I had one of those head slapping "how stupid could I possibly be" moments when E opened the LK89 manual and pointed to one of the drawings.  In the interest of sparing someone else the same crazy-making day I had yesterday, here's what the drawing pointed out:  To adjust the upper thread tension on the LK89, you don't just turn the knob from 1 to 6.  You turn it from 1 to 6 and then you keep turning it.  If you have your LK89 tension set at 3 and you move it to 4, you haven't done much of anything.  You need to move it to 4 and then keep turning (and turning) if you want to see a difference in the tension.

This is completely obvious when you look at the little hash marks on the top of the tensioner.  Notice in the first photo, above the number 6, you see four little hash marks.  In the second photo, above the number 6, you see only two little hash marks.  This is because I turned and turned and turned the tensioner knob, going past the number 6 a couple of times.  (I took the bottom cover plate off when I took the photo to keep it from acting like a mirror.  Also, you can ignore the blue tape -- I was using it as a seam guide.)


So, there you have it.  Now you know a couple of things you might not have known before you read this blog post:  First, you know how to adjust the upper thread tension on a Lady Kenmore 89.  Second, you know just how dense I can be.